Man, I can't even imagine what I am going to feel like in ten weeks because I am feeling huge right now! It's not necessarily the way I look that is bothering me so much, but the fact that it is getting nearly impossible for me to bend down and tie my own shoes...and forget taking my boots off on my own! This morning, it took me three attempts just to get off the couch! I usually wear my husband's T-shirts to bed, and they are slowly but surely starting to become quite tight across my mid-section (why can't he wear a size large?). I have been needing more naps lately too. We had a doctor's appointment this morning at 10:00, and by 11:30 I was in bed for a quick 45-minute nap. Our baby is already two pounds and I think she is sucking a lot of energy out of me!
I am also feeling lots of aches and pains (is this what it feels like to be old?). My back hurts quite often, and I start to feel an uncomfortable tightness in my stomach after walking around too much or being too active. In fact, I had quite the scare the other day after going on a two-mile walk with Jacob and Kobi (our dog). Once we came back from our walk, my stomach became so tight that I could not even deeply inhale. It felt like all my insides were bursting. It was honestly the most painful thing I have ever experienced. My doctor prescribed me some muscle relaxers to take when needed. I guess for some odd reasons my ab muscles are not loosening up the way they should, which is making the baby and all of my guts quite crowded. Today at our appointment, our doctor told me that my stomach is still way too hard and my muscles are too defined--especially on top--and that it would make it quite hard for me to have a C-section. In a way, that's good news because this mama does not want a C-section! I guess P9-X Ab Ripper really does work!
Aside from feeling like a big mama, there are some other changes in my body that I am starting to notice. Someone pointed out the other day that I am starting to develop the linea nigra--a dark line that goes vertically down your baby belly. It's not very dark yet though--I wonder if it gets darker? I am also able to see my belly move a lot as this hyper baby practices Lord of the Dance in my uterus. Sometimes when my laptop is resting on top my belly, I see it kind of bounce up and down. SO WEIRD!
Well, I guess that's all I have for. I am scheduled to have a 3D ultrasound on February 27th...but part of me is kind of nervous to see the baby's face! I will post pictures on here if all goes well.
tata
Monday, February 13, 2012
Wednesday, February 1, 2012
How to Hang a Wall Gallery
Okay you Pinterest lovers, how many of you have ever repinned some sort of wall gallery or photo collage on one of your "Home Inspiration" boards? I bet that most of you have, because wall galleries are all the rage right now!
Trying to hang one, however, can be quite the daunting task. Luckily, I am married to MacGuyver and he came up with a fool proof way to hang the collage just the way I wanted. It wasn't too complicated and everything ended up super straight and perfect!
In order to hang a wall gallery this way, you will need:
-A giant piece of cardboard that is at least a couple inches bigger than your gallery will be when on the wall
-Tape measure
-Pencil
-Leveler (I think that's what they're called...)
-Blue painter's tape
-Nails
-Hammer
-Drill
First, we got two giant pieces of cardboard and taped them together. I had already figured out exactly how I wanted to hang the gallery ahead of time, so I just laid out the arrangement on the cardboard, exactly how I wanted it.
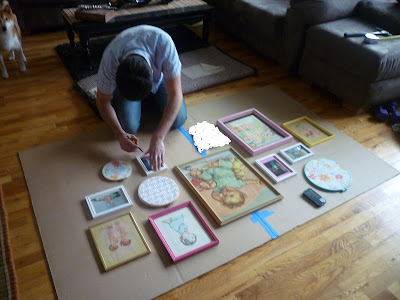
Then, carefully trace the outline of all the pictures (or whatever else you are hanging) with pencil. Once the item is traced, take it off of the cardboard. You might want to write in the outline exactly what it is that is hanging in that spot, so you don't forget or get mixed up.
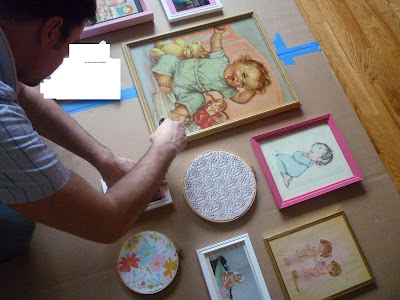
Now, this is the tricky part. On each item you are hanging, you want to measure exactly where the nail needs to be placed in order to hang it. Some frames have hooks, cables, or just little holes for hanging. Whatever it may be, use a measuring tape to find out exactly where it is, and then measure the outline on the cardboard of that same item. Use your pencil and make a circle on that spot. Do this for all of the items that are going to be hung in the gallery.
You will then use a drill and drill holes in each of the pencil circles you created. Now, it gets funner (I know, I know, that's not a word)!
Place the cardboard on the wall where you want your gallery. Make sure it is EXACTLY RIGHT before you drill any holes. Use painter's tape to tape the cardboard template to the wall, and then use a level to make sure it is hanging straight on the wall.

Now, all you have to do is mark on the wall with pencil THROUGH THE HOLES IN YOUR CARDBOARD TEMPLATE where the nails are going to go. Make sure each pencil marking is dark so you don't get lost once you take the cardboard off the wall.


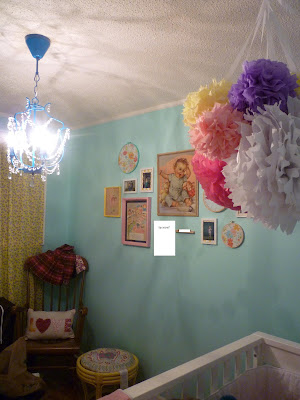
Take the template off the wall, but keep it close by for reference (you don't want to end up hanging the wrong thing in the wrong place). Now, it's Hammer Time! We used small tac nails. One at a time, hammer nails exactly where the mark is on the wall. Hang the picture on the nail. Slowly, you will see your gallery come to life before your eyes... and boy, is it rewarding!
Now, sit back and enjoy your creation!
Here is an example of ours, but we put up some stuff with the baby's potential name/initials on it and those are being kept secret from you all. :)

This might seem like it takes a long time, but it really doesn't. This method seems easier than any other wall gallery tutorial I have seen on the internet.
Trying to hang one, however, can be quite the daunting task. Luckily, I am married to MacGuyver and he came up with a fool proof way to hang the collage just the way I wanted. It wasn't too complicated and everything ended up super straight and perfect!
In order to hang a wall gallery this way, you will need:
-A giant piece of cardboard that is at least a couple inches bigger than your gallery will be when on the wall
-Tape measure
-Pencil
-Leveler (I think that's what they're called...)
-Blue painter's tape
-Nails
-Hammer
-Drill
First, we got two giant pieces of cardboard and taped them together. I had already figured out exactly how I wanted to hang the gallery ahead of time, so I just laid out the arrangement on the cardboard, exactly how I wanted it.

Then, carefully trace the outline of all the pictures (or whatever else you are hanging) with pencil. Once the item is traced, take it off of the cardboard. You might want to write in the outline exactly what it is that is hanging in that spot, so you don't forget or get mixed up.

Now, this is the tricky part. On each item you are hanging, you want to measure exactly where the nail needs to be placed in order to hang it. Some frames have hooks, cables, or just little holes for hanging. Whatever it may be, use a measuring tape to find out exactly where it is, and then measure the outline on the cardboard of that same item. Use your pencil and make a circle on that spot. Do this for all of the items that are going to be hung in the gallery.
You will then use a drill and drill holes in each of the pencil circles you created. Now, it gets funner (I know, I know, that's not a word)!
Place the cardboard on the wall where you want your gallery. Make sure it is EXACTLY RIGHT before you drill any holes. Use painter's tape to tape the cardboard template to the wall, and then use a level to make sure it is hanging straight on the wall.

Now, all you have to do is mark on the wall with pencil THROUGH THE HOLES IN YOUR CARDBOARD TEMPLATE where the nails are going to go. Make sure each pencil marking is dark so you don't get lost once you take the cardboard off the wall.


Take the template off the wall, but keep it close by for reference (you don't want to end up hanging the wrong thing in the wrong place). Now, it's Hammer Time! We used small tac nails. One at a time, hammer nails exactly where the mark is on the wall. Hang the picture on the nail. Slowly, you will see your gallery come to life before your eyes... and boy, is it rewarding!
Now, sit back and enjoy your creation!
Here is an example of ours, but we put up some stuff with the baby's potential name/initials on it and those are being kept secret from you all. :)


This might seem like it takes a long time, but it really doesn't. This method seems easier than any other wall gallery tutorial I have seen on the internet.
DIY Easy No-Sew Curtains
Although Mr. Brother and I aren't the greatest of friends, I DO know how to operate a sewing machine. However, I don't really have one at my disposable and even if I did, threading the darn thing makes me want to pull my hair out and I would probably avoid it anyway. Thanks to Young House Love (man I love those guys), I found an easy no-sew curtain tutorial on the internet and ended up making some spiffy wall coverings for the baby room.
Making curtains is honestly such an awesome way to go, cause I usually find it really difficult to actually get my hands on the exact kind of curtains I want. Curtains in the store can actually be really expensive--around $40 a panel!
I found this cute, bright calico fabric at Hancock fabrics, and it was on sale for $3.99 a yard. I needed about five yards of it. I got my measurements knowing that I needed two panels (the entire width of the bolt, I think 48 inches) and wanted them to go all the way down to the floor. I also added an inch or two for the hem.
So, if you want to do this yourself, you will need:
-2 rolls of extra strength/ultra hold hem tape

-5 yards of your desired fabric (or however much you want to use, depending on the length of curtains you want)
-fabric scissors
-iron and ironing board
-drapery clips (Target, Joann Fabrics)
-curtain rod
Seriously it is super simple. Pick a corner to start your "hem making." All you do is fold the top of the fabric over enough to cover the hem tape. Cut a section of hem tape and place it under the fold. You do not want any of the hem tape to show (it should all be under the fabric fold) because it gets super sticky and can ruin your iron.

Make sure you are folding over evenly and that the fold does not get skinnier or fatter throughout the fabric. This will cause your curtains to be uneven and hang poorly (and probably just look plain crappy).
You only have to hold the iron on the tape for a couple seconds, and the tape basically turns to glue and holds your fold together. Keep doing this until all four edges of your fabric have a nice straight hem.

I finished both pieces of fabric. Then, I mounted a super cheap curtain rod above the window in the baby room. I got some drapery clips from Joann's that I spray painted pink (the bronze did not really match the room) and then slid them onto the rod. after that, all you have to do is clip on your beautifully hemmed no-sew curtains!
The great thing about this is that you literally have ENDLESS options for patterns and colors for curtains. I just used calico fabric because it is relatively cheap and comes in thousands of patterns, but you could go for a thicker fabric if you wanted to.

Subscribe to:
Posts (Atom)